
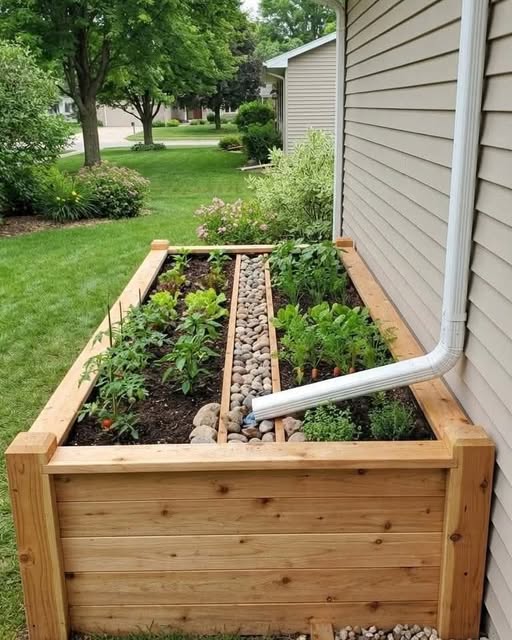
Position your raised bed garden against the house for optimal sunlight and accessibility. Choose cedar, redwood, or locust for durability. Ensure 6-8 hours of direct sunlight daily, near water access. Clear and level the area, enrich soil with compost, and compact for stability. Use untreated cedar boards secured with hex screws. Fill with nutrient-rich soil mix and water thoroughly. Align the bed with the house and add framing angles for support. Secure to the house for stability. Enjoy benefits like enhanced drainage, growth potential, and extended growing seasons. Maintain with regular watering, mulching, and pest monitoring. Create a thriving garden haven!
Materials for Raised Bed
When building a raised bed garden against a house, selecting the right materials is crucial for ensuring longevity and functionality. Cedar stands out as a popular choice due to its durability and rot-resistance. Untreated cedar, along with redwood and locust, are excellent options for constructing raised beds near a house. If you opt for treated wood, make sure it is treated with safe compounds to avoid any harmful chemicals leaching into your soil. It’s advisable to steer clear of using materials like pallets that have been treated with harmful chemicals when building raised beds against a house, as these can contaminate your soil over time. If you’re looking for alternative materials, consider using concrete, composite wood, cinder blocks, or rocks to create your raised bed. Each of these materials offers unique benefits and can be a sturdy choice for your garden project. Choose wisely to ensure a successful and long-lasting raised bed garden against your house.
Choosing the Right Location
To ensure your raised bed garden thrives against your house, choosing the right location is key. When selecting the perfect spot for your raised bed, consider the following:
- Direct Sunlight: Make sure the location receives a minimum of 6-8 hours of direct sunlight each day. This is crucial for the optimal growth of your plants in the raised bed.
- Proximity to the House: Choose a location close to your house for easy access to water, tools, and harvesting. This convenience will make tending to your garden a breeze.
- Well-Drained Ground: Ensure the ground is level and well-drained to prevent waterlogging in the raised bed. Proper drainage is essential to avoid root rot and other water-related issues.
Clearing and Leveling the Area
First, roll up your sleeves and get ready to clear the space against the house. Remove all grass, weeds, and debris using a shovel and rake, ensuring a clean area to work with. Then, grab your level tool and meticulously level the ground, creating a sturdy foundation for your raised bed garden.
Clearing the Space
Begin the process of creating your raised bed garden against the house by clearing and leveling the area where it will be placed. First, clear the space from any debris, rocks, or existing plants to provide a clean canvas for your garden. Removing these obstacles will not only make the area look neater but will also prevent any interference with the growth of your plants. Next, ensure you level the ground where the raised bed will sit. This step is crucial for the stability of the raised bed and proper drainage to avoid water pooling. Additionally, consider the distance from the house to allow easy access for maintenance and to prevent any potential damage to the structure. By placing the raised bed at the right distance, you can ensure a harmonious blend between your garden and your home.
Leveling the Ground
Start by meticulously clearing the ground against your house, removing any grass, rocks, or debris to establish a clean and solid foundation for your raised bed garden. Once the area is clear, it’s time to focus on leveling the ground. Grab a shovel to fill in any low spots and remove excess soil from high areas. Use a rake to evenly distribute the soil, creating a smooth surface. Check the level of the ground with a level tool to ensure it’s flat and even.
After leveling, gently compact the soil using the back of the rake or a tamper to create a stable base for your raised bed. This step is crucial to prevent the bed from shifting over time. A compacted soil base will provide a secure foundation for your garden against the house. By taking the time to level and compact the ground properly, you’ll ensure that your raised bed sits securely and that water drains away from the house, preventing potential damage.
Preparing the Foundation
To establish a sturdy foundation for your raised bed garden against the house, the first step is to clear and level the designated area meticulously. Begin by removing any debris, rocks, or roots from the ground to create a clean foundation. Use a level tool to ensure the ground is flat, providing a stable base for the raised bed construction. Properly leveling the ground is crucial to prevent water pooling and to guarantee adequate drainage for your garden. Taking the time to prepare a solid foundation will increase the stability and longevity of your raised bed garden. By following these steps, you are setting the groundwork for a successful gardening project that will thrive against your house.
- Clearing the area meticulously creates a clean foundation for your garden.
- Leveling the ground ensures a stable base for the raised bed.
- Proper drainage is guaranteed by leveling the ground correctly.
Preparing the Soil
Loosen the soil in your designated raised bed area by flipping sod clumps and incorporating necessary amendments to enhance drainage and aeration for optimal plant growth. Make sure the raised bed area receives ample sunlight, at least 6 to 8 hours daily, to support the plants’ growth. Remove grass or smother it effectively to prevent competition for resources. To create a fertile environment, mix the topsoil with compost, aiming for around 25% of the soil volume to be compost. Follow these steps to ensure the soil is well-prepared for planting, promoting proper drainage and fertility.
| Soil Preparation Tips | Description | Benefits |
|---|---|---|
| Flipping Sod Clumps | Breaks up compacted soil | Improves soil aeration |
| Adding Compost | Enriches soil with nutrients | Boosts plant growth |
| Mixing Topsoil | Enhances soil structure | Improves drainage capabilities |
Selecting the Wood
When selecting the wood for your raised bed against a house, you want to consider a few key points. Cedar is a popular choice due to its natural resistance to rot, while treated wood can provide durability with safe compounds. Don’t forget about options like railroad ties treated with creosote or untreated pine, redwood, or locust for your project.
Wood Material Options
Consider the various wood material options available when selecting the best material for your raised bed garden against a house. When choosing the wood for your raised bed, you have several options to consider:
- Cedar: Known for its natural rot-resistance and being budget-friendly, cedar is a popular choice among gardeners. It offers durability and a beautiful aesthetic to your garden space.
- Redwood: While more expensive, redwood is a durable option for constructing raised beds. Its longevity and strength make it a premium choice for those willing to invest in quality.
- Douglas Fir: If you are looking for a more budget-friendly alternative to cedar and redwood, Douglas Fir is a suitable option. It provides decent durability while being gentle on your wallet.
When selecting the wood material for your raised bed garden against a house, weigh the factors of rot-resistance, cost-effectiveness, and durability to find the best fit for your gardening needs.
Considerations for Durability
For optimal durability when selecting the wood for your raised bed garden against a house, prioritize natural rot-resistant options like cedar, redwood, or other suitable wood choices such as hemlock, walnut, black locust, and oak. Cedar is a popular choice due to its affordability and inherent resistance to decay, making it ideal for long-lasting raised beds. While redwood is more costly, it offers excellent durability, making it a premium option for those willing to invest in their garden beds. It’s crucial to avoid treated lumber, railroad ties with Creosote, and recycled wood with unknown treatments, as they may contain harmful chemicals that can leach into the soil. If wood isn’t your preference, consider alternative materials like concrete blocks, bricks, cinder blocks, felled logs, metal tubs, wine barrels, or straw bales as sturdy alternatives for creating raised beds against a house. Prioritizing durability ensures your raised bed garden remains a sustainable and enduring addition to your home.

Determining Bed Size
To determine the ideal bed size for your raised garden against a house, aim for a width of 3 to 4 feet to ensure easy access and maintenance. Narrower beds against walls are not only easier to manage but also provide a cozy and organized feel to your gardening space. Additionally, shorter bed lengths can make maneuvering around your raised bed garden a breeze, especially when placed snugly against a house.
Consider the following when deciding on the dimensions of your raised bed garden:
- Efficiency: Opting for a 3 to 4 feet wide bed maximizes space utilization and makes caring for your plants a joy.
- Accessibility: Narrower beds allow you to comfortably reach all areas of your garden without straining.
- Organization: Creating separate raised beds for different plant families enhances plant organization and promotes healthier growth.
Assembling the Bed
First, assemble the bed frame using untreated cedar boards secured with hex screws and framing angles for added stability. Next, carefully fill the bed with a nutrient-rich soil mix, ensuring it is level and firmly packed. Finally, position the bed snugly against the house, taking care to anchor it securely for support.
Bed Frame Assembly
When assembling the bed frame for your raised garden, start by selecting untreated cedar boards to ensure durability and resistance to rot. Cedar is not only sturdy but also naturally resistant to decay, making it an ideal choice for outdoor projects. To ensure your bed frame is sturdy and long-lasting, follow these tips:
- Secure with Hex Screws: Use hex screws, washers, and nuts to firmly attach the boards together. This will provide stability and prevent the frame from wobbling.
- Consider Framing Angles: Adding framing angles to the corners of the bed frame not only enhances the structural integrity but also gives a polished look to your garden bed.
- Repurpose Lumber: If you’re looking to save on costs, consider repurposing lumber for joining corners. This eco-friendly option can give your garden bed a unique touch while being budget-conscious.
Soil Filling Tips
For optimal plant growth support when assembling the raised bed against a house, ensure proper soil filling using a mixture of sandy loam garden soil and organic matter. Avoid using plastic bottles or trash bags as filler in the raised bed soil. These materials can hinder plant growth and may not provide adequate nutrients. Instead, focus on creating a healthy environment for your plants by using a combination of sandy loam soil and organic matter. After filling the raised bed, make sure to wet the soil thoroughly. This step is crucial in preparing the soil for planting, as it helps create the right moisture levels for your plants to thrive. Once the soil is moist, level it with a rake to create an even surface. This will not only make planting easier but also ensure that water is distributed evenly throughout the raised bed, promoting optimal plant growth.
Positioning Near House
Thinking about where to position your raised bed against the house for optimal growth potential and aesthetics? To ensure your raised bed thrives, follow these essential steps:
- Position the raised bed against a sunny wall of the house to maximize sunlight exposure for your plants, aiding in their growth and health.
- Use a level to align the bed with the house. This not only ensures a visually appealing look but also helps with water drainage and overall stability.
- Secure the bed to the house using brackets or anchors. By doing this, you prevent any unwanted movement or shifting, especially during windy days or heavy rainfall.
Filling the Bed With Soil
To properly fill your raised bed garden against a house, begin by combining sandy loam garden soil and organic matter for optimal plant growth. Properly calculating the amount of soil needed based on the size of your raised bed is essential for proper filling. Avoid using plastic bottles or trash bags as filler in the raised bed soil, as this can hinder plant growth. After filling the bed, wet the soil thoroughly and level it with a rake to ensure even planting. Below is a practical guide to help you achieve the ideal soil mixture for your raised bed:
| Soil Type | Amount Needed |
|---|---|
| Sandy Loam | 2/3 of the bed |
| Organic Matter | 1/3 of the bed |
Mix these components well to create a nutrient-rich environment for your plants. Following these steps will ensure that your raised bed is properly filled and ready for successful gardening against your house.
Sun Exposure Considerations
When planning your raised bed garden against your house, it’s crucial to consider the direction of sunlight and shade patterns. Analyze where the sun hits the wall throughout the day to ensure your plants get the right amount of light. Understanding these factors will help you choose the optimal location for your raised bed garden to thrive.
Ideal Sun Direction
For optimal sun exposure in your raised bed garden against a house, aim for a south-facing direction to ensure your plants receive the maximum sunlight needed for healthy growth. South-facing beds receive direct sunlight throughout the day, providing the ideal conditions for robust plant development in your vegetable garden. If a south-facing orientation is not feasible, consider east or west-facing positions to guarantee at least 6-8 hours of sunlight exposure. Remember, north-facing beds receive minimal sunlight and are less optimal for successful vegetable gardening endeavors. Proper sun exposure plays a crucial role in promoting healthy plant growth and ultimately leads to higher yields in your raised bed garden.
- Bask in the sunshine: South-facing beds soak up the most sunlight, fueling your plants with energy.
- Rise and shine: East or west-facing beds offer a good alternative if south isn’t an option, ensuring your garden gets its fair share of sunlight.
- Light up your garden: Remember, north-facing beds are not the best choice as they receive less sunlight, hindering plant growth potential.
Shade Patterns Analysis
Consider observing the shade movements against your house throughout the day to analyze sun exposure patterns for your raised bed garden. Note where full sun, partial sun, and shade areas fall to determine the best plant placement. Keep in mind that nearby structures, trees, and landscaping can also affect the shade patterns against your house. To track the sun’s path accurately, utilize tools such as a sun chart or compass. Understanding the duration of sunlight in different areas will help you adjust your raised bed garden layout effectively. By aligning your plant selection with the sun exposure levels, you can create an environment that promotes optimal growth conditions. Remember to regularly monitor the shade patterns against your house as they can shift subtly throughout the seasons. Adapting to these changes ensures that your plants receive the right amount of sunlight for healthy development.
Benefits of Raised Bed
Enhance your gardening experience by reaping the numerous benefits of utilizing a raised bed against your house. Raised beds offer a range of advantages that can significantly improve your gardening outcomes:
- Improved Soil Quality: With raised beds, you have better control over the composition of your soil, ensuring optimal conditions for your plants to thrive.
- Enhanced Drainage: Say goodbye to waterlogged soil issues as raised beds promote excellent drainage, preventing root rot and other water-related problems.
- Optimized Nutrient Levels: By closely monitoring the soil in raised beds, you can easily adjust and maintain the nutrient levels required for healthy plant growth.
Furthermore, the microclimate created near your house can extend your growing season, allowing for a longer harvest. Additionally, plants in raised beds benefit from the radiant heat emitted by the house, fostering quicker growth and maturation. Make the most of these benefits and watch your garden flourish against your home.

Maximizing Garden Space
Utilize vertical surfaces by building a raised bed garden against your house to effectively maximize your garden space. This smart approach not only saves precious ground area but also provides easy access for tending to your plants right outside your doorstep. Placing your raised beds against the house allows them to benefit from the radiant heat and shelter the building offers, creating a favorable microclimate for your plants. When setting up your garden, consider the orientation of your house to ensure optimal sunlight exposure and protect your plants from harsh weather conditions.
To prevent any potential water damage to your house’s foundation, it’s crucial to incorporate proper drainage and waterproofing measures into your raised bed design. By taking these precautions, you can enjoy a flourishing garden while safeguarding your home. Make the most of your available space by strategically utilizing vertical surfaces and maximizing the benefits your house can offer to your garden.
Enhancing Garden Aesthetics
To enhance the overall appeal of your raised bed garden against the house, start by incorporating trellises or vertical gardening structures to both maximize space and create a visually captivating garden setting. These elements not only provide support for climbing plants but also add a vertical dimension to your garden, making it more visually interesting. Next, consider planting a variety of colorful flowers, herbs, or ornamental plants to elevate the aesthetic appeal of your raised bed garden. This burst of colors and textures will bring life to the space and create a vibrant atmosphere. Additionally, use decorative edging materials such as bricks or stones to define the borders of your garden with elegance and sophistication. The defined edges not only add a polished look but also help keep your garden organized and visually appealing. Lastly, installing outdoor lighting fixtures around the raised bed garden can illuminate the area, creating a charming ambiance in the evenings and making your garden a delightful spot to relax and unwind.
Easy Gardening Access
Positioning your raised bed garden in close proximity to your house ensures effortless gardening access for daily care and upkeep. Imagine stepping just outside your door to tend to your plants, water them, and harvest your produce without having to trek across the yard. The convenience of having your raised bed against your house not only saves you time but also makes it easier to keep a close eye on your garden’s progress. From monitoring growth to spotting any pests or issues early on, being able to quickly check on your plants is a game-changer.
Moreover, having a raised bed against your house can enhance the visual appeal of your outdoor space. It creates a seamless transition between your indoor and outdoor living areas, making your garden feel like an extension of your home. The proximity to your house also means you’re more likely to spend time in your garden, enjoying the beauty and tranquility it adds to your living environment.
Avoiding Common Mistakes
For a successful raised bed garden against your house, ensuring key considerations can help you avoid common mistakes and maximize the benefits of this convenient setup. To ensure a thriving garden and protect your home, follow these essential guidelines:
- Avoid Treated Wood: Using treated wood near your house can introduce harmful chemicals into the soil, posing risks to your plants and potentially your home environment.
- Proper Drainage is Key: Angle your raised bed away from the house foundation to prevent water buildup that could lead to water damage.
- Use a Protective Barrier: Place a protective barrier between the raised bed and your house to shield against moisture and potential damage.
Maintenance Tips
Keeping your raised bed garden flourishing against your house requires consistent maintenance practices to ensure optimal plant health and productivity. Regular watering is crucial to keep your plants healthy and thriving. Mulching around your plants can help retain moisture in the soil, reducing the need for frequent watering and promoting healthy plant growth. Additionally, make sure to fertilize the soil as needed to provide essential nutrients for your plants to flourish.
It is important to monitor your raised bed garden regularly for pests and diseases. By staying vigilant and addressing any issues promptly, you can protect your plants and maintain a thriving garden. Consider rotating your crops in the raised bed garden to prevent soil depletion and ensure a balanced soil nutrient profile.